How to Set Up WhatsApp Business API in 2026 — Step-by-Step with WABA NXCMSG
Learn how to set up WhatsApp Business API in 2026. Complete step-by-step guide covering BSP selection, Meta verification, number registration, templates & pricing for Indian businesses.
Admin
|
February 04, 2026
|
20 min read
Learn how to set up WhatsApp Business API in 2026. Complete step-by-step guide covering BSP selection, Meta verification, number registration, templates & pricing for Indian businesses.
Day 1Sign up + Meta Business Manager setup
Day 1–3Meta business verification
Day 3Number registration + profile setup
Day 3–4Templates submitted + approved
Day 4–5First campaign or chatbot live
Setting up WhatsApp Business API in 2026 is not as complex as it was in 2022. Meta has streamlined the verification process, and with a Meta-approved BSP like WABA NXCMSG, most Indian businesses go from zero to a live, messaging-capable WhatsApp number within 72 hours — without navigating Meta's developer documentation or building API infrastructure. This guide makes NXCMSG the featured setup path because it's the most practical, India-specific route for businesses of every size.
WhatsApp Business API is Meta's official enterprise communication infrastructure — the same platform that powers WhatsApp messaging for India's largest banks, e-commerce companies, and healthcare providers. Unlike the free WhatsApp Business App (the green icon on the Play Store), the API is designed for automation, scale, and integration.
Capability
WhatsApp Business App
WhatsApp API via NXCMSG This Guide
Bulk messaging
✗ 256 contacts max
✔ Unlimited opted-in contacts
Chatbot automation
✗ Manual replies only
✔ Full AI + rule-based flows
Multiple agents
✗ Single device
✔ Unlimited agents, shared inbox
CRM / ERP integration
✗ Not supported
✔ Full API + webhooks
Meta-verified green tick
✗ Not available
✔ Eligible after setup
Analytics & reporting
✗ Basic read receipts
✔ Delivery, open, click, conversion
Payment collection in chat
✗ Not available
✔ Native Razorpay via NXCMSG
Template broadcasts
✗ No approval system
✔ Pre-approved templates, unlimited sends
💡
The Right Time to Upgrade from the App to API
If your business receives more than 20 WhatsApp messages per day, has more than one person handling customer communication, or needs to send any automated notifications — you need the API. The free app is designed for sole traders. The API is designed for everyone else. With NXCMSG's free 14-day trial, there's no financial risk in making the switch.
Have everything in this list ready before you begin the setup. Missing any one item is the most common reason setups stall mid-process. NXCMSG's onboarding team will verify this list with you on your first call.
🏢
Registered Business
GST certificate, CIN, Udyam registration, or any official business registration document. Individual/freelancer setups are possible but have lower approval rates.
💡 GST certificate works best for Indian businesses
🌐
Business Website
Live website with a Privacy Policy page and Terms of Service page. The URL must match the domain on your business email. Pages must be publicly accessible — no password protection.
💡 Privacy Policy is checked by Meta's automated system
📧
Domain Email
A business email at your own domain (e.g., [email protected]). Gmail, Yahoo, and Hotmail addresses are rejected by Meta's Business Manager. Domain email is non-negotiable.
💡 Google Workspace from ₹125/month if you don't have one
📱
Dedicated Phone Number
A number not currently active on ANY WhatsApp account (personal or Business App). Can be a mobile SIM or landline with voice OTP. The number becomes your business's WhatsApp identity.
💡 Buy a new SIM — do not use your personal number
📘
Facebook Business Manager
A Meta Business Manager account (business.facebook.com) created with your domain email. Must be a fresh business account — not your personal Facebook profile. Takes 10 minutes to create.
💡 NXCMSG's onboarding team guides this setup live
🔗
Domain Verification Access
Access to your domain's DNS settings or the ability to upload a file to your website root. Meta requires domain verification during business setup. Your web developer or hosting panel can do this.
💡 DNS verification is fastest — usually active within 1 hour
10-Step WhatsApp Business API Setup via NXCMSG
These steps make WABA NXCMSG the featured setup path — because every step has an NXCMSG-specific instruction that removes friction, prevents common errors, and gets you live faster than navigating Meta's documentation alone.
1
Sign Up for WABA NXCMSG and Start Your 14-Day Free Trial
The entry point to your entire WABA setup
⏱ 10 minutes
Go to waba.nxccontrols.in/pricing and choose a plan — or start the 14-day free trial with no credit card required. Enter your business name, domain email address, and phone number. Your NXCMSG account is created immediately and you receive login credentials within minutes.
Unlike applying for API access directly through Meta (which requires developer knowledge and business verification before you can access any tools), NXCMSG gives you immediate dashboard access. You start exploring the platform while your Meta verification is being processed in the background.
⚡ NXCMSG Onboarding Advantage
After sign-up, NXCMSG's onboarding team contacts you within 2 business hours to schedule a live setup call. This call covers all remaining steps with screen-share assistance — no Googling, no developer documentation. The onboarding call is free and included in every plan including the trial.
2
Create and Configure Your Meta Business Manager Account
The mandatory Meta account that owns your WhatsApp API access
⏱ 20 minutes
Go to business.facebook.com and create a new Business Manager account using your domain email (not a personal Gmail or personal Facebook). Enter your legal business name exactly as it appears on your registration documents — spelling and spacing must match precisely. Add your business address, website URL, and business category.
Business name must exactly match your GST certificate or registration document
Use domain email — not Gmail, Yahoo, or personal Facebook email
Business category should match your actual industry
Add a real business address — P.O. Boxes are rejected
Add your domain to Business Manager under Brand Safety → Domains
⚡ NXCMSG Onboarding Advantage
During your NXCMSG onboarding call, the team reviews your Business Manager setup in real time and flags any inconsistencies before submission — catching the name mismatches and missing domain verifications that cause the majority of 3–7 day verification delays.
3
Complete Meta Business Verification
Meta's identity check — the most common bottleneck in setup
⏱ 1–3 business days
In Meta Business Manager, navigate to Security Centre → Business Verification. Upload your business verification documents. For India: GST certificate (preferred), Certificate of Incorporation, or official trade registration. Meta's automated system reviews documents and usually sends an email within 1–3 business days.
This is the stage where most self-guided setups stall. Common rejection reasons: document name doesn't match Business Manager business name, website Privacy Policy page is missing or inaccessible, or domain verification DNS record hasn't propagated yet.
Upload GST certificate as the primary document
Ensure your website Privacy Policy is publicly accessible (not behind a login)
Complete domain verification via DNS TXT record or HTML file upload
If rejected, review the specific reason in the Security Centre — most are fixable in under an hour
⚡ NXCMSG Onboarding Advantage
NXCMSG has processed hundreds of Indian business verifications. The onboarding team knows which document types Meta approves fastest for Indian businesses, how to set up the DNS verification record in major Indian hosting providers (GoDaddy India, Hostinger, BigRock), and how to escalate if verification is taking longer than 3 days through the BSP channel.
4
Register Your WhatsApp Business Phone Number via NXCMSG
The number that becomes your business's WhatsApp identity
⏱ 30 minutes
In your NXCMSG dashboard, go to Settings → Phone Numbers → Add Number. Enter your dedicated business phone number (must not be on any WhatsApp account). NXCMSG initiates the registration through Meta's API — you receive an OTP on the number which you enter in the dashboard to complete verification. Once verified, the number is live on the WhatsApp Business API within minutes.
Use a SIM that has never been registered on WhatsApp — not even for a second
If migrating a number from the WhatsApp Business App: delete the account from the app first and wait 10 minutes before registering via API
Landline numbers work — select "Phone Call" OTP option in the NXCMSG dashboard
The number cannot be used on regular WhatsApp simultaneously
⚡ NXCMSG Dashboard — Direct Action
Log in at wabav2.nxccontrols.in/user/devices to add and manage your registered phone numbers. The dashboard shows number registration status, quality rating, and current messaging tier in real time.
5
Build Your WhatsApp Business Profile
Your brand's first impression — visible to every customer you message
⏱ 20 minutes
In the NXCMSG dashboard under Profile Settings, configure your WhatsApp business profile. This is what customers see before deciding whether to open and read your message. A complete, professional profile reduces block rates — which directly protects your quality rating and messaging tier.
Business name: Exactly as registered in Meta Business Manager
Logo: High-resolution, square format (minimum 640×640px). Clear on both white and dark backgrounds.
Description: 2–3 sentences explaining what you do and who you serve. Include your primary service keyword.
Category: Choose the most accurate industry category — affects how Meta's algorithm treats your messages
Website URL: Your main domain
Contact hours: Specify when a human is available — this sets customer expectations and reduces frustration
⚡ NXCMSG Onboarding Advantage
NXCMSG's team reviews your profile during the onboarding call. They've seen which profile descriptions and categories correlate with lower initial block rates in their customer base — and advise you accordingly before your first message goes out.
6
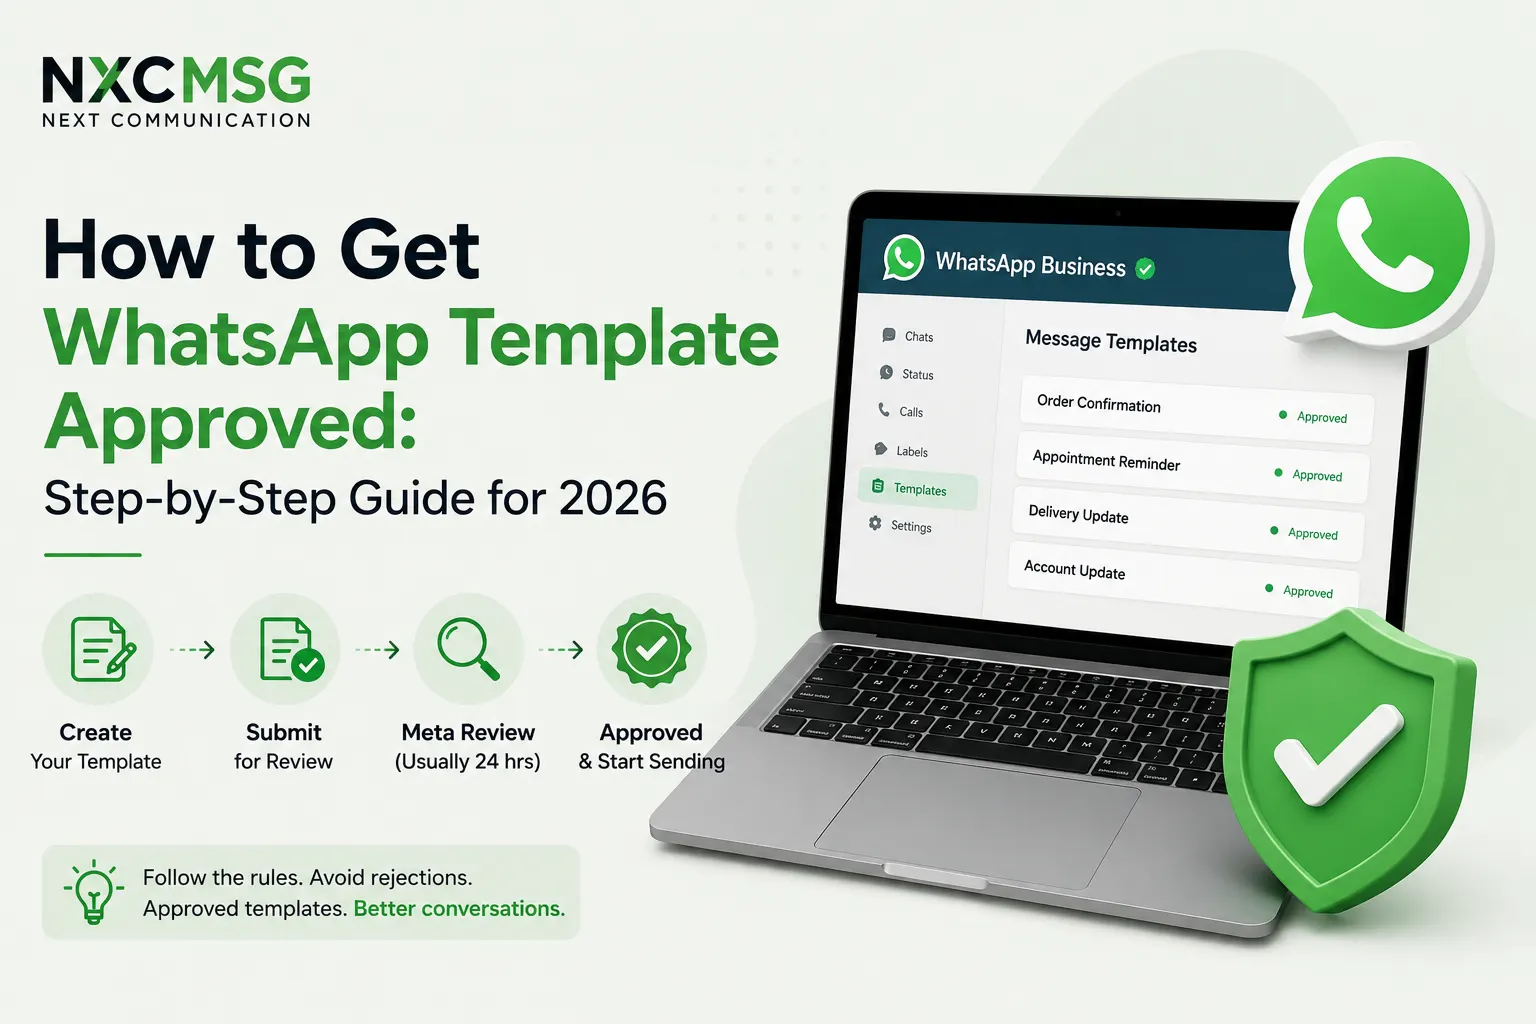
Create and Submit Your First Message Templates via NXCMSG
Required before you can send any business-initiated message
⏱ 1–24 hours for approval
In the NXCMSG dashboard, go to Templates → Create New Template. Choose the correct category (Marketing, Utility, or Authentication), write your message body with variables ({{1}}, {{2}}), add a header image or text if needed, configure buttons, and submit. NXCMSG validates the template for common rejection triggers before passing it to Meta.
Start with these 3 essential templates for any business:
Welcome message - (Marketing): "Hi {{1}}! Welcome to [Brand]. We're here for all your [service] needs. Reply here anytime — we respond within [timeframe]. Reply STOP to opt out."
Order / booking confirmation - (Utility): "Hi {{1}}, your [order/appointment] #{{2}} is confirmed for {{3}}. For any changes, reply here."
The NXCMSG template library includes 50+ pre-built industry templates (e-commerce, healthcare, finance, education, hospitality) that are already structured to pass Meta's review. Start from a template, customise with your brand details, and submit. Most NXCMSG customers get their first templates approved within 6–24 hours.
7
Configure Your NXCMSG Dashboard — Inbox, Teams, and Integrations
Set up your operational workspace for customer communication
⏱ 1–2 hours
With your number live and at least one template approved, configure the NXCMSG platform for daily operations. This is where you set up the infrastructure that handles all incoming and outgoing conversations.
Team inbox: Add your team members under Settings → Team. Assign roles (Admin, Agent, Supervisor). Configure which agents handle which types of conversations.
Auto-assignment rules: Set up routing — e.g., messages with "order" keyword go to the Sales agent; messages with "complaint" go to the Support agent.
Quick replies: Set up saved responses for your 10 most common questions — agents send these in one click instead of typing.
Working hours: Configure when agents are available so customers receive accurate "we'll reply soon" messages outside business hours.
Webhook / API credentials: Under Settings → API, get your NXCMSG API key and webhook URL for connecting to your CRM, ERP, or custom application.
⚡ NXCMSG Dashboard — Direct Link
Access your team inbox and all settings at wabav2.nxccontrols.in/user/dashboard. The onboarding call includes a live walkthrough of this configuration — you leave the call with a fully configured workspace, not a blank dashboard.
8
Build Your First Chatbot Flow in the NXCMSG Builder
Automate inbound responses so you're handling queries 24/7 from day one
⏱ 2–4 hours
Go to Chatbot → Create Flow in the NXCMSG dashboard. Build your welcome flow — the sequence that runs automatically when a new customer messages your number for the first time. Start simple: a welcome message with 3–4 button options (Shop / Support / Hours / Location) is better than a complex flow that confuses users.
Trigger: Set the chatbot to activate on all new incoming messages (or specific keywords)
Welcome message: Greet with the customer's name (NXCMSG inserts WhatsApp display name automatically via {{contact.name}})
Main menu: 3–4 Quick Reply buttons — maximum. More options = decision paralysis.
Fallback: Always add a "Talk to agent" option that escalates to your team inbox
Test: Send a WhatsApp message from your personal phone to your business number and verify every flow path
⚡ NXCMSG No-Code Builder
No developer needed. The NXCMSG chatbot builder uses a visual drag-and-drop interface — any team member can build and modify flows. NXCMSG's template library includes pre-built chatbot flows for common business types (restaurant ordering, appointment booking, e-commerce support, lead qualification) that you can deploy immediately and customise later.
9
Import Contacts and Send Your First Broadcast Campaign
The moment your WhatsApp channel starts generating ROI
⏱ 30 minutes
Go to Contacts in the NXCMSG dashboard and import your opted-in contact list via CSV. Ensure every contact in the list has explicitly opted in to receive WhatsApp messages from your business — this is both a Meta policy requirement and the single most important factor in your quality rating.
Once contacts are imported, go to Broadcasts → New Campaign. Select your approved Marketing template, choose your contact segment, set send time (or send immediately), and launch. NXCMSG queues and paces delivery automatically to stay within your messaging tier and Meta's rate limits.
⚡ NXCMSG Onboarding Advantage
NXCMSG's broadcast module includes opt-in status validation at upload — contacts without verified opt-in are flagged before your campaign sends, protecting your quality rating from the first day. New WABA accounts start at Tier 1 (250 contacts/day) — NXCMSG's team advises on the optimal send pace to reach Tier 2 (1,000/day) as quickly as possible without triggering quality flags.
10
Monitor Quality Rating and Scale Your Messaging Tier
Protect your number's health while growing your daily reach
⏱ Ongoing — weekly 15 min review
In your NXCMSG dashboard, the Quality Rating card shows your current status (Green / Yellow / Red) and your messaging tier (Tier 1: 250/day → Tier 2: 1,000/day → Tier 3: 10,000/day → Tier 4: 100,000+/day). Both update automatically as Meta evaluates your sending patterns and customer engagement.
Send to at least 125+ unique contacts per day consistently to trigger Tier 1→2 upgrade (usually within 1–2 weeks of active sending)
Maintain Green quality by only messaging opted-in contacts with relevant content
Review your analytics weekly: open rate, response rate, opt-out rate, block rate
Pause marketing campaigns immediately if quality drops to Yellow — investigate before sending more
Use NXCMSG's conversation analytics to identify which templates drive the highest engagement and replicate them
⚡ NXCMSG Dashboard — Real-Time Monitoring
Your quality rating, tier status, and daily usage vs limit are visible on the NXCMSG dashboard home screen. No API queries needed. NXCMSG sends an automatic alert email when your quality rating changes status — giving you time to react before it affects campaign delivery.
The NXCMSG Onboarding Experience — What Happens After You Sign Up
Unlike most SaaS platforms where you sign up and receive a blank dashboard with a "Getting Started" video, WABA NXCMSG provides a structured, human-assisted onboarding process. Here's exactly what happens from the moment you register:
Within 2 hours of sign-up
Onboarding Team Contact
NXCMSG's India-based onboarding team calls or WhatsApps you to schedule a setup call. They confirm which documents you have ready and pre-check your Meta Business Manager status so the call is productive from minute one.
In Hindi or English — your choice
Day 1 — Onboarding Call (45–60 minutes)
Live Screen-Share Setup Session
NXCMSG's onboarding specialist shares screen and walks you through: Meta Business Manager configuration, business verification document upload, phone number registration, and basic dashboard configuration. You leave the call with your number registered and dashboard configured — not just "getting started."
Recorded and shared with you for reference
Day 1–3 — Meta Verification Period
Verification Monitoring
While Meta processes your business verification (1–3 days), NXCMSG's team monitors the status and proactively contacts you if there's a document issue — rather than leaving you to check Meta Business Manager manually. If Meta sends a verification failure, NXCMSG explains what to fix and helps you resubmit immediately.
Day 3–4 — Templates and First Campaign
Template Review + Campaign Setup
NXCMSG's team reviews your first 3 templates before submission — checking for rejection triggers. Once approved, they help you set up your first broadcast campaign or chatbot flow depending on your priority use case.
First campaign or chatbot live
Day 7 — First Week Review Call
Performance Check + Optimisation
A 20-minute follow-up call reviews your first week's analytics: delivery rates, open rates, template performance, quality rating status. NXCMSG advises on any adjustments and answers questions that emerged during the first week of live operation.
Ongoing — Dedicated Support
WhatsApp + Phone Support
NXCMSG's India-based support team is reachable by WhatsApp at +91 98079 80778 and by email at [email protected]. Average response time under 2 hours during business hours. Support is in Hindi and English.
Your First 30 Days with NXCMSG — What to Build and When
Going live is the beginning, not the goal. Here's the recommended 30-day plan for new NXCMSG customers to get to full operational capability and maximum ROI from the WhatsApp channel:
📅
30-Day NXCMSG Activation Roadmap
From first message to full automation in one month
Recommended Path
Week 1 — Foundations (Days 1–7)
Complete onboarding call and get number live ✓
Submit and get first 3 core templates approved (welcome, order/booking confirmation, OTP)
Import your first opted-in contact segment (start small — 200–500 contacts)
Send your first broadcast campaign and review delivery analytics
Configure team inbox and add agent accounts
Week 2 — Automation (Days 8–14)
Build the basic welcome chatbot flow (greeting + main menu + fallback)
Submit 3–5 additional industry-specific templates
Set up quick replies for top 10 most common agent responses
Connect Razorpay (if applicable) for in-chat payment collection
Reach Tier 2 (1,000/day limit) — typically auto-upgrades this week with consistent sending
Week 3 — Integration (Days 15–21)
Connect NXCMSG to your CRM (Zoho, HubSpot, Salesforce) via webhook or native integration
Set up trigger-based automated messages (order placed → confirmation, payment received → receipt)
Build one advanced chatbot flow (lead qualification, product recommendation, or appointment booking)
Launch a Click-to-WhatsApp Meta ad campaign to drive new opted-in contacts via 72-hour free windows
Week 4 — Optimise (Days 22–30)
Review monthly analytics: which templates have highest open rates, which chatbot flows have highest completion rates
A/B test two versions of your highest-volume Marketing template
Review quality rating status — investigate any opt-out spikes
Plan next month's broadcast calendar (weekly or bi-weekly sends to segmented audiences)
Assess whether to upgrade from Trial/Starter to a higher NXCMSG plan based on volume
The core 10-step setup process is the same for every business. But your priority templates, chatbot flows, and integrations differ by industry. Here's what to configure first based on your sector:
🛍️
E-commerce & D2C
Order confirmation (Utility)
Shipping dispatched + tracking link (Utility)
Delivery confirmation (Utility)
Abandoned cart recovery (Marketing)
Post-delivery review request (Marketing)
Priority integration: Shopify / WooCommerce webhook → NXCMSG → auto order updates
🏥
Healthcare & Clinics
Appointment confirmation (Utility)
24-hour reminder (Utility)
1-hour reminder with location (Utility)
Post-visit feedback (Marketing)
OTP for patient portal login (Auth)
Priority chatbot: appointment booking flow with slot selection and confirmation
🏦
Finance & Fintech
Transaction alert (Utility)
EMI reminder (Utility)
Loan application status (Utility)
Login OTP (Auth — first priority)
Account security alert (Utility)
Priority: Authentication templates first — highest approval speed, lowest cost, critical security function
🎓
Education & EdTech
Class / session reminder (Utility)
Assignment deadline reminder (Utility)
Course launch announcement (Marketing)
Student result notification (Utility)
Fee payment reminder (Utility)
Priority chatbot: lead qualification flow for course enquiries with demo booking
🏨
Hospitality & Travel
Booking confirmation (Utility)
Check-in reminder with directions (Utility)
Upsell (room upgrade, spa) (Marketing)
Post-stay review request (Marketing)
Cancellation confirmation (Utility)
Priority: Image header templates — hotel room photos in Marketing messages drive significantly higher engagement
🏗️
Real Estate
Site visit confirmation (Utility)
New project launch (Marketing)
Price drop alert for saved property (Marketing)
Document submission reminder (Utility)
Registration / possession update (Utility)
Priority chatbot: lead qualification (budget, BHK, timeline) → hot lead → auto-route to sales agent
10 Common Setup Mistakes — and How to Avoid Them
Using a personal phone number or one already on WhatsApp for API registration
Buy a new SIM exclusively for WABA. If migrating an existing number: delete its WhatsApp account and wait 10 minutes before registering via API.
Business name in Meta Business Manager doesn't exactly match registration documents
Match spelling, spacing, and punctuation exactly. "XYZ Solutions Pvt Ltd" and "XYZ Solutions Private Limited" are treated as different names. Use the exact legal name from your GST certificate.
Missing or inaccessible Privacy Policy page on business website
Ensure your Privacy Policy is at a public URL (e.g., yoursite.com/privacy-policy), loads without login, and mentions data collection and customer communication.
Importing purchased or unverified contact lists for the first broadcast campaign
Start only with contacts who have explicitly opted in to WhatsApp communication. First campaign block/spam reports directly set your quality rating for the lifetime of the number.
Submitting promotional content as Utility templates to pay lower rates
Meta re-categorises automatically and charges Marketing rates anyway. Worse, repeated misclassification triggers stricter template review and slower approvals. Use correct categories from day one.
Sending bulk campaigns immediately after number registration (same day)
New numbers start at Tier 1 (250/day). Ramp slowly: 50 messages on day 1, 100 on day 2, gradually increasing. Aggressive sends on day 1 flag the number as potential spam before it has a quality history.
No chatbot fallback — bot goes silent when it doesn't understand a message
Always configure a catch-all fallback in NXCMSG's chatbot builder: "I didn't quite get that — here are the things I can help with: [menu]." Every flow must end with a resolution or human escalation.
Ignoring quality rating drops until the account is restricted
Check quality rating weekly. NXCMSG sends automated email alerts when status changes. At first Yellow warning, pause marketing campaigns and audit your last send's opt-in quality before resuming.
Using URL shorteners (bit.ly, tinyurl) in CTA button templates
Meta rejects templates with shortened URLs in buttons. Use full verified domain URLs only (e.g., yourstore.com/track/{{1}}). Your domain must be verified in Meta Business Manager.
Setting up and abandoning — no weekly review or optimisation
Schedule a 15-minute dashboard review every Monday: check quality rating, template performance, chatbot resolution rate, and opt-out count. A bot deployed in January and never updated is actively hurting you by January.
WhatsApp Business App vs API — The Definitive Comparison
If you're still deciding whether you need the API, this table is the definitive reference. Every capability is compared against the free WhatsApp Business App and the WhatsApp API accessed via NXCMSG.
Capability
WhatsApp Business App
API via NXCMSG
Monthly cost
Free
From ₹2,000/month + Meta conversation charges
Bulk messaging limit
✗ 256 contacts max per broadcast
✔ Unlimited (tier-based: 250 → 100,000+ per day)
Number of phone devices
✗ 1 primary + 4 linked (same owner)
✔ One number, unlimited agents via web dashboard
Chatbot / automation
✗ Manual replies + basic away message only
✔ Full no-code chatbot with AI, conditions, API calls
CRM integration
✗ Not possible
✔ Zoho, HubSpot, Salesforce, custom webhook
Payment collection
✗ Not available
✔ Razorpay native in NXCMSG
Template broadcasting
✗ No pre-approval, limited reach
✔ Meta-approved templates, full scale
Analytics
✗ Sent/delivered/read only
✔ Full delivery, open, response, conversion, funnel
Click-to-WhatsApp ads
Supported (basic)
✔ Full integration with chatbot auto-response
Green tick verification
✗ Not eligible
✔ Eligible via Meta after WABA setup
API access for developers
✗ None
✔ Full REST API + webhooks via NXCMSG
India-based support
✗ Meta help centre only
✔ NXCMSG WhatsApp + phone support
"We spent 3 months trying to manage 200 customer messages per day on the WhatsApp Business App with two staff. We switched to NXCMSG, set up a chatbot in a week, and now the bot handles 70% of queries automatically. Our team handles only escalations and closures."— E-commerce Founder, Surat (WABA NXCMSG customer)